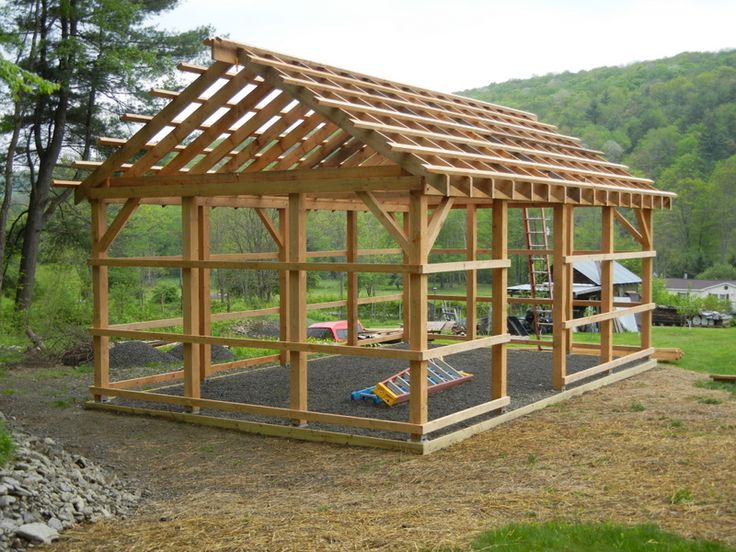
Pole barns, with their simple construction and versatile design, have become increasingly popular for a variety of applications, from workshops and storage spaces to garages and even agricultural facilities. A particularly appealing variation is the open-sided pole barn, which offers a unique blend of shelter and open-air accessibility. This guide provides a comprehensive, step-by-step approach to building your own open-sided pole barn.
I. Planning and Preparation
1. Design and Layout
Determine your needs: Consider the intended use of the barn, such as storage, workshop, or shelter for animals. This will inform the size, layout, and features you require.
Develop a design: Sketch out your desired barn dimensions, including the overall length, width, and height. Decide on the positioning of doors, windows, and any additional features.
Plan the open sides: Determine which sides will remain open and the desired degree of openness. Consider factors like weather conditions, privacy, and desired airflow.
Choose materials: Select materials for the poles, roof, and siding based on your budget and desired aesthetics. Common options include pressure-treated lumber for poles, steel roofing, and metal siding.
2. Site Preparation
Obtain permits: Check local building codes and obtain any necessary permits for construction.
Clear the site: Remove any vegetation, debris, and existing structures from the construction area.
Level the ground: Create a flat, level building pad using gravel or compacted soil. The pad should extend beyond the proposed barn footprint to prevent erosion and provide drainage.
Consider utilities: Plan for the installation of electricity, plumbing, and other utilities. Consider running lines underground for aesthetic purposes and to avoid trip hazards.
II. Foundation and Pole Installation
1. Foundation
Concrete footings: For optimal stability and durability, use concrete footings for the pole supports. These should be sized according to the weight of the barn and local building codes.
Footing placement: Excavate holes for the footings, following the planned layout of the poles. Ensure proper spacing and alignment.
Concrete pouring: Pour concrete into the excavated holes, ensuring it is level and compacted. Allow sufficient curing time before proceeding.
2. Pole Installation
Pole selection: Choose pressure-treated lumber poles of appropriate length and diameter. The diameter should be adequate to support the weight of the roof and walls.
Pre-drilling: Before inserting poles into the footings, pre-drill holes in the bottom of the poles to facilitate easier installation.
Setting poles: Carefully set the poles into the prepared concrete footings, ensuring they are plumb and level. Use temporary bracing to maintain their position until the concrete sets.
III. Framing and Roof Construction
1. Wall Framing
Top plate installation: Attach a top plate to the top of the poles, creating the horizontal framing for the walls.
Wall stud placement: Install wall studs, typically 16 inches on center, between the top and bottom plates. The studs should be sized to support the chosen wall cladding.
Wall sheathing: Apply plywood or OSB sheathing to the exterior of the framed walls for structural support and to provide a base for the siding.
2. Roof Framing
Rafter selection: Choose rafters of appropriate size and spacing to support the weight of the roof covering.
Rafter placement: Place rafters at a specified pitch, typically between 4/12 and 6/12, to ensure proper drainage. Secure them to the top plate and to the ridge board, which is installed at the center of the roof.
Roof sheathing: Apply plywood or OSB sheathing to the roof frame, creating a solid base for the roofing material.
3. Roof Covering
Roofing selection: Choose a roofing material that suits your budget, aesthetic preferences, and local climate. Popular options include metal roofing, asphalt shingles, or rubber membrane roofing.
Installation: Install the roofing material according to the manufacturer's instructions, ensuring proper flashing and sealing around vents, skylights, and edges.
IV. Siding and Finishing Touches
1. Siding Installation
Siding choice: Select a siding material that complements the overall design and offers desired durability and maintenance characteristics. Options include metal siding, vinyl siding, or wood siding.
Installation: Install the chosen siding according to manufacturer guidelines, ensuring proper alignment and overlapping for weatherproofing.
2. Open Side Considerations
Open side treatments: For the open sides, consider installing a combination of features to enhance functionality and aesthetics:
Support posts: Install posts along the open sides to provide support for a roof overhang or to create a defined boundary.
Lattice panels: Use lattice panels to add visual interest and provide a degree of privacy while allowing air circulation.
Curtains or canvas: Consider using curtains or canvas drapes for added privacy or weather protection.
3. Doors and Windows
Door selection: Choose doors based on the desired size, style, and functionality. Consider a sliding door for easy access or a double door for larger equipment.
Window installation: Install windows for natural lighting and ventilation. Consider using high-performance windows for energy efficiency.
4. Interior and Exterior Finishes
Floor finish: Install flooring for the interior of the barn, choosing a material suitable for its intended use. Options include concrete, wood, or epoxy flooring.
Paint or stain: Apply paint or stain to the interior and exterior surfaces to enhance aesthetics and provide protection from the elements.
V. Electrical and Utilities
Electrical wiring: Run electrical wiring according to local codes and best practices. Install outlets, switches, and lighting fixtures as needed.
Plumbing installation: If plumbing is required, ensure proper installation and connections to a water source and waste disposal system.
VI. Maintenance and Safety
Regular inspection: Regularly inspect the barn for any signs of damage or deterioration.
Roof maintenance: Inspect and maintain the roof, including gutters and downspouts, to prevent leaks and damage.
Pole support: Check the pole supports for any signs of cracking or movement.
Safety measures: Implement safety precautions, such as fire extinguishers and clearly marked exit routes.
Building an open-sided pole barn is a rewarding project that offers flexibility and functionality. By following these steps and carefully planning each stage, you can create a durable and versatile structure that meets your needs and enhances your property for years to come.
Sign up here with your email
ConversionConversion EmoticonEmoticon