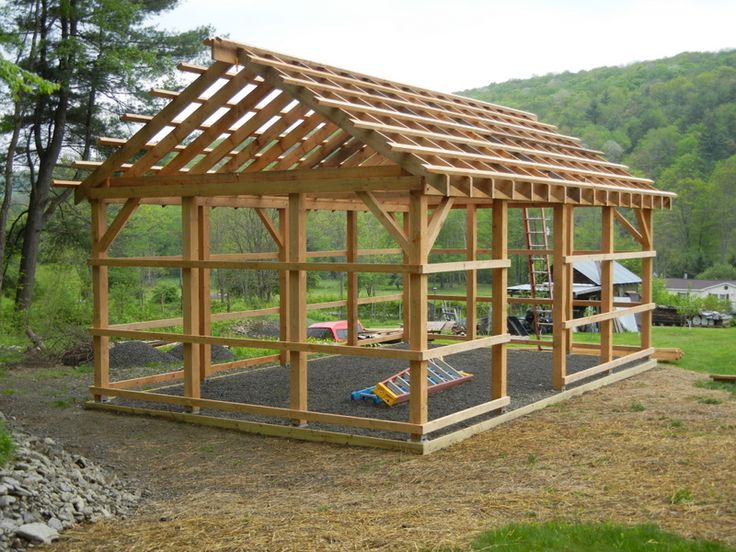
A pole barn, with its robust construction and versatility, offers a compelling solution for various purposes, from workshops and garages to barns for livestock and storage sheds. This guide provides a comprehensive overview of building a pole barn, including the essential steps for insulation, ensuring both durability and energy efficiency.
1. Planning and Design:
a) Determining the Purpose:
The first step is to clearly define the purpose of your pole barn. Will it be used for storage, workshops, livestock housing, or a combination of uses? This will guide the size, layout, and features of your barn.
b) Site Selection and Assessment:
Choose a level and well-drained site with good access for delivery trucks and equipment. Assess soil conditions and consider potential hazards such as underground utilities or flooding.
c) Planning the Dimensions:
Determine the required length, width, and height of the barn. Factor in the intended usage, vehicle access, and storage needs. Consider a minimum ceiling height of 8 feet for ample headroom.
d) Design Considerations:
- Doors: Include enough doors for convenient access, considering the size of equipment and vehicles.
- Windows: Ensure proper ventilation and natural light.
- Roof Pitch: A steeper pitch improves drainage and snow shedding, especially in snowy climates.
- Electrical and Plumbing: Plan for electrical outlets, lighting, and potentially plumbing if necessary.
- Insulation: Select the appropriate insulation type and thickness based on your climate and intended use.
2. Foundation and Pole Erection:
a) Foundation Preparation:
- Excavate holes for the pole bases, ensuring depth below the frost line for stability.
- Pour concrete footings for each pole, allowing for adequate curing time before proceeding.
- Ensure the poles are plumb and level before securing them to the concrete footings using anchors or bolts.
b) Pole Selection and Installation:
- Select pressure-treated lumber for the poles, ensuring sufficient strength and rot resistance.
- Use a crane or heavy equipment to erect the poles, ensuring they are plumb and level.
- Temporarily brace the poles for stability during construction.
3. Framing and Roofing:
a) Framing the Walls and Roof:
- Construct the wall and roof framing using treated lumber, ensuring proper bracing and support.
- Consider using prefabricated trusses for the roof framing for faster and more efficient construction.
b) Roofing Installation:
- Choose a suitable roofing material, considering factors like durability, weather resistance, and aesthetics.
- Install the roofing underlayment to prevent water damage and ensure proper drainage.
- Install the chosen roofing material, following manufacturer instructions for proper installation.
4. Insulation and Wall Covering:
a) Insulation Selection:
- Choose insulation based on your climate, budget, and desired level of energy efficiency.
- Common options include fiberglass batt insulation, blown-in cellulose insulation, and rigid foam insulation.
- Fiberglass Batt Insulation: Affordable and widely available, it requires careful installation to avoid gaps and ensure airtightness.
- Blown-in Cellulose Insulation: Provides good insulation and soundproofing, requiring professional installation.
- Rigid Foam Insulation: Offers superior R-values but is more expensive.
b) Insulation Installation:
- Install the insulation according to the manufacturer's instructions, ensuring proper coverage and compression.
- Pay attention to sealing gaps and cracks for optimal energy efficiency.
- Consider using a vapor barrier on the warm side of the insulation to prevent moisture buildup.
c) Wall Covering:
- Choose wall covering based on aesthetics and functionality.
- Popular options include plywood sheathing, oriented strand board (OSB), and metal siding.
- Ensure proper installation for a durable and weather-resistant exterior.
5. Interior Finishing:
a) Interior Walls and Ceiling:
- Finish the interior walls and ceiling using drywall, paneling, or other materials.
- Ensure proper ventilation and moisture control to prevent mold and mildew growth.
- Consider applying a moisture barrier to the interior walls if necessary.
b) Electrical and Plumbing:
- Install electrical outlets, lighting fixtures, and any necessary plumbing according to local codes.
- Consult with qualified electricians and plumbers for safe and proper installation.
c) Finishing Touches:
- Install windows and doors, ensuring proper installation and weatherstripping for energy efficiency.
- Apply paint or stain to the interior and exterior surfaces to enhance aesthetics and protect the materials.
6. Maintenance and Longevity:
- Regularly inspect the pole barn for signs of damage or wear and tear.
- Perform routine maintenance tasks, including cleaning gutters, inspecting the roof, and checking for leaks.
- Consider applying a protective sealant to the exterior surfaces to enhance longevity.
Conclusion:
Building a pole barn with insulation requires careful planning, meticulous execution, and a commitment to quality materials. By following these steps, you can ensure a robust, energy-efficient, and versatile structure that will serve your needs for years to come. Remember to always consult with local building codes and obtain necessary permits for safe and legal construction.
Sign up here with your email
ConversionConversion EmoticonEmoticon